Gerald is a Hero

Gerald is a Hero

Mud Butt in Ecuador’ Day 1

Hello!!!

Well, I am here in Ecuador and life is good except for one big problem!!  The computers are all in Spanish!  The nerve!  🙂 Which means that it took approximately 2 minutes for me to figure out how to make that smiley face icon!  So, needless to say…..all of the smiles that I want to send your way will have to be understood.
In all seriousness, life is really fantastic.  Let me start by saying that Delta Airlines is the very best airline in the entire world and I will fly them always and forever!  Why, you ask? (And it took me 90 seconds just to find the qestion mark!!  This might be painful!!- at least you can all heave a huge sigh of relief, knowing that I did manage to find the exclamation mark!)
Anyway…..due to a series of unfortunate, stupid events on my part, I had to buy a last minute bag at the airport and check it on top of the other two I had already checked.  It was supposed to cost two hundred dollars!! When I told the guy that it was important and that doing volunteer work was expensive, he asked exactly what I am doing. After I explained, he waived the fee and told me to just buy him dinner sometime.  Seriously.  So I teared up, which made him nervous, and he shoo-ed me off towards the gate.  All I am saying is if you ever meet Gerald at Delta Check-In, tell him that he is a hero.
After a five hour flight, I landed in Quito, Ecuador in one of the scariest landings I have EVER experienced.  We went sideways back and forth across the runway and I really thought that I was going to need my pre-flight video training!  I always did want to slide down one of those slide-y things that attach to the side of a plane. (this would be one of those places that you assume a smiley face!!)   Turns out that the wind gusts from the two neighboring volcanoes make this an interesting landing at times.  Hey, it is all part of the adventure, right?
Customs and luggage were no problem, even though we are required to give customs the address where we are staying.  I have absolutely no idea where I am staying!  But I just write down something vague and head off to meet my ride.  A nice young man and his girlfriend are there, holding a sign with my name written on it and in two shakes, we were off in the Ecuadorian rain.  I try to catch glimpses of as much as I can, but the swirls of neon and honking horns come to a stop much to quickly as they drop me off at my residence.
Lizbeth, the woman that owns the house, shows me to my room and gives me a set of keys to the four locked doors between me and the street. My room is small and clean and has a private bath.   I am very happy to see it.  When asked how much the room costs, she says ´´ten dollars per night´´.  You´ve gotta love it!!  Tomorrow I am off to see FOSJE and to take on Quito.  Until then……my bed is calling!!
Love,   Anna

Shoe’s April AT hike 2010

Late Trip Report from April – Part 1

by shoe

Shoe

The first week of April brought a week long trip with my friend from North Carolina Sweet Pea. It was kind of a strange trip in that we did Dick’s Creek Gap to Winding Stair Gap then flipped and did Springer to Woody Gap. For a total of about 60 miles.

This won’t be an extensive trip report for no reason other than I don’t feel like writing alot about it right now. :) When I find my journals I will write more.
Day 1: April 5th – Dick’s Creek Gap to Bly Gap – 9 miles

Tough day overall. Alot of longish uphill walking.Ran into a super snobby thru hiker. When she found out we weren’t thrus she turned her nose and kept walking. Later when I got the Bly Gap she informed me that we could camp up top (away from where she was I am sure). I bet she’s off the trail now. Camped on the upper portion near the “famous” tree. Great view of the stars.

Day 2: April 6th – Bly Gap to Standing Indian Mountain – 9.2 miles
This was an awesome day for me. This was the strongest I have ever felt while hiking. Even the last climb of the day didn’t put me in a mood. I guess working out can make a difference. Camping atop Standing Indian has so far been my favorite place. The sky was clear, a beautiful sunset and then the stars came out. What else could one ask for? Except for maybe a closer water source.

Day 3: April 7th – Standing Indian to campsite before Albert Mountain – 11.8ish miles

Another great day. At first I didn’t thinnk North Carolina wanted us to visit. The trail was actually quite steep for the first part of they day. The NC decides that “hey, you’re ok” and gives us the most amazing trail ever. Nice, without alot of up and downs. Our friend Kellye met us at Mooney Gap and brought us trail magic. Oranges and Reese’s and ice cold Diet Coke.

Day 4: April 8th – Albert to Winding Stair – 10.2 miles
Otherwise known as the day of the torential downpour. We made it up to the top of Albert without any rain but no views from the top. This was my second time with no view. We made it to Big Spring Shelter and took a break and the rain just let loose. We hung around trying to wait for the rain to stop but no such luck. So we had to hike about 9 miles in the pouring rain. There goes my record of never having to have hiked in any major rain. I think we made it the 9 miles in about 3 hours. I ain’t ever hiked that fast in my life.

We stayed at Kellye’s place this night and washed our gear and ate at Longhorn’s and played Wii Fit (which is the most hilarious thing ever). And decided to hike Springer to Woody since SweetPea had never hiked that section

Weather Forecasting for Hikes

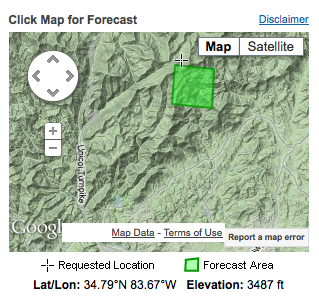
Ever noticed that the forecast for the nearest town to a hike may be vastly different from the conditions up in the mountains?  You can get the forecast for any location in the mountains or in the middle of no-where using the NOAA website.  They have an interactive map that provides the “point forecast” for your hiking destination using a Google Map locator.

Here is an example for Tray Mountain:

Here is how I get this forecast:

1. Go to the main NOAA website and the left box labeled “Local forecast by “city, St.” Enter in the nearest town to the hike.

2. Scroll down to the middle of the page, and on the right side, locate a box with a google map labeled “Click Map for Forecast”. Move the map by dragging your mouse on the map and zooming in and out to locate where you will be hiking. Double click on the location to select the location of interest. It will then become highlighted by a green box. NOTE: I find it helpful to consult my National Geographic Trails Illustrated Map (#777 and #778 for our area) which shows detailed trail/town and road locations on a topo map so I can orient myself on the google map (which doesn’t always show trails but does have contours).

3. This will provide a forecast of the exact location of the hike. I take the forecast for the highest elevation I will be at for the day.

Here is more information if you have trouble or want to learn more.

Posted  by 

The Curvy Chicks Guide To Hiking- Part 2


This is a re-post of an article that I wrote for The More of Me To Love Website.  For more info, check out 
www.moreormetolove.com

TD fun2

(Continued from part 1)

As I said in part 1………..

First, remember the basic tenants to responsible hiking.  

  • Always tell someone where you are going
  • Research the trail
  • Take a friend
  • Never leave your car without the 10 Essentials. 

    Simply put- food, water, rain gear, warm clothes, fire starter,   compass and map, first aid kit, head lamp, knife, and emergency contact info. 

A simple Google search will list the 10 Essentials in more details for you. Just remember that being prepared on the trail is the best way to assure a pleasant trip.


    Physical Challenges  

The physical challenges that rounder hikers face can be easily compensated for.  These fall into several different categories:


    Managing your pace-When you hike, the first thing to remember is to enjoy yourself.  It is not a race or a competition.  The best thing about being out on the trail is experiencing the smells and sounds of nature, which you cannot do if you are rushing.

    If you are gasping for breath, slow down.  I have done trails that required me to take a step….stop and breathe…take a step…..stop and breathe.  In the end, you will still get to the top of the mountain; it will just be a much more pleasant journey if you respect your body’s natural pace.

    Along these lines, chose your hiking partner with care.  You want someone that has a similar walking style and speed.  Finally, taking rest stops frequently will help you to not only enjoy the hike, but to take in your surroundings.   


    Knee Health– While all hikers need to take care of their feet and knees, the curvy hiker has to be even more aware.  The majority of stress that we are asking our bodies to support can be alleviated in two simple words.  Hiking poles.  Hiking poles are a girl’s best friend!  Not only do they help protect your knees, they also improve your balance.  They make crossing a stream on rocks much easier and even give you something to lean on when you get tired. 

    However, be aware that not all hiking poles are the same.  The cheap hiking poles available at many big box stores are fairly worthless.  I have seen many cheap poles break under pressure and that could lead to an ugly spill.  Good hiking poles tend to start around $80, but the health of your body is certainly worth that, wouldn’t you say?     


    Foot Health– This is one place where shoe fit is very important.  Poorly fit shoes or boots can lead not only to blisters, but to more lingering problems like plantar fascitis and Achilles tendonitis.  Many trails can be hiked in a good pair of running shoes.  If you decide that you love hiking and would like to move up to a pair of boots, go to a specialty hiking store and have them professionally fit.  Again, the health and comfort of your feet are more than worth it.

    Also, carry blister treatment and prevention with you on all hikes.  If you feel a hot spot coming on, sit down on the trail and take care of it.  Don’t make the mistake of saying, “It is only a mile back to the car”.  A mile on a hiking trail is longer and harder than a mile on a road.  Go ahead and treat the hot spot and you will be on your way before you know it.


    Sweating and Chafing – On a little more personal note, sweating and chafing are a major concern.  Again, they are concerns for most hikers, but they seem to be a larger source of discomfort, both physically and mentally, for curvy hikers.

    When it comes to sweating, I say enjoy it!  Revel in the fact that you are moving your body…. exercising it and stretching it.  You are doing something athletic and you should be sweating.  In terms of keeping yourself comfortable, pin a bandana to the strap of your day pack and let it hang down as you hike. This keeps it handy so that you can wipe off your face as you walk. 

    Also, remember that light jacket in your pack?  The one from the list of 10 Essentials?  When you stop for a break, throw it on.  Your damp clothing will cause you to get chilled very quickly and that can be dangerous. 

    Finally, don’t hike in cotton.  It absorbs all of that sweat and lets all of your body heat out.  Look for performance materials that allow your body to stay warm when they are wet.


    Chafing– chafing takes place wherever moisture and rubbing meet. Anywhere you have skin rubbing on skin, chafing can become an issue.  This can be the crotch or groin, under your arms, and under your breasts. Chafing can become very painful if not treated. 

    The best way to avoid chafing is to stay dry.  Hmmmm…..not so easy when you are hiking!!  Luckily, there are several products you can use to combat chafing.  My favorite is Body Glide.  It can be found at most sporting goods stores.  It looks like a deodorant stick and can be applied anywhere chafing is a potential problem.  I truly never leave home without it.

    You can also apply Vaseline or petroleum jelly to affected areas.  This both prevents and treats chafing.  Slather it on before you leave home.  A little prevention will go a long way to helping you have a wonderful trail experience!

   What is your personal challenge?  Comment below and we will visit the topics in a follow up post!

Anna aka Mud Butt

Backpacking Food-Tips for Beginners

Several folks have asked about easy backpacking food ideas.   Figuring out how to eat on the trail has been one of the most challenging things for me, but has ended up making the biggest difference for how much energy I have on the trail.  I hope these tips can help you out.

Here are a few of my principles and thoughts on backpacking food:

-The most important thing is to bring food that you know makes your tummy happy.  Sometimes you may not have much of an appetite, but you need to eat anyway to get energy, so it helps to bring foods that you find appealing.

-Figure out what works best for YOU. There are many approaches to backpacking food.  Find one that works for you, depending on what type of person you are.   Do you like to cook and experiment? Do you want to spend more time relaxing and not worry about it?  Some people need to eat a lot on the trail (like me), while others like to refuel after they get off the trail.  Some people like powerbars. Some like packaged dehydrated meals.  Don’t worry about what other people do– they may eat more or less than you, or eat at completely different times.  Stay in tune with your body, and pay attention to your energy levels.  Everyone is different, do what works for you.

-Think about food as your fuel. Choose foods that give long-lasting energy (with lots of complex carbs, healthy fats, and protein). You will burn a ton of calories out backpacking, and while many of us want to loose weight, you still need to eat or you’ll “boink” (which is crash and have no energy and feel terrible).

Eating right out of the bag saves on cleanup

-Choose foods that are easy to prepare.  While I love to cook at home, on the trail I prefer food that I can eat instantly and that require no cleanup, things I can eat right out of a bag. If I cook (which I rarely do anymore), I boil water and add it to a bag of food– I don’t like to cook anything other than water in my pot so I don’t have a pot to clean up afterward.

-Eat like a hobbit on the trail!  This will help you maintain constant energy and prevents stomach upset.  When you backpack, you are asking your body to work hard for long periods of time, so it may have more trouble digesting large meals. So when you backpack, have a bunch of small meals and snacks.  I eat every two hours when I’m backpacking.  I think of it as breakfast, second breakfast, tea time snack, lunch, afternoon snack, pre-dinner snack, dinner, and dessert.

-Weather changes your metabolism.  Many people get really hungry when it’s cold.  Feeling queasy or have a headache on a hot day?  It could be because you are dehydrated and/or not getting enough electrolytes. In the heat, salty foods, electrolyte replacements, or fruit help replace what your body looses in sweat.

Tortillas, cheese, instant black beans, and peppers make a fast and easy lunch.

Here are some websites to get you started:

One Pan Wonders  – lots of great recipes.

Trail Cooking and the Outdoors– more easy recipes

Food in the backcountry  -another viewpoint on how to eat in the outdoors

Freezer bag cooking information

Going stoveless

Posted  by